My sweet granny is now an angel.
As I mentioned in an earlier post, my maternal grandmother has been fighting lung cancer for the last (almost) four years. She fought it as hard and as long as she could, but she lost her battle on Thanksgiving day, at two o'clock in the afternoon. She went to meet Jesus the way she would have wanted to... at home, surrounded by her family, with her daughter and twin sister right by her side. We are sad for us, but we are so happy for her. She is no longer in pain, she is no longer broken, she is no longer scared or confused. She is whole.
In late August, she went on hospice. At that point, they were saying she would only be with us for a few more weeks... she showed them. She got over a little hiccup and started doing better. By September, she was planning a little baby shower for our family. She helped where she could, but was tired a lot of the time. She had started to decline again at this point, but she held on for that baby shower. She was so excited about our baby girl. I'll never forget her face when we told her we were expecting, when we showed her that first ultrasound... pure joy. After the baby shower, her health really took a turn for the worse. She slept more, ate less, and we all knew it wouldn't be much longer. Last weekend, she had to be catheterized, because she could no longer leave her bed. On Monday, we were told she didn't have much time left. Her 70th birthday was on Tuesday. At that point, she was sleeping most of the day and not eating at all.
Thursday morning, I was woken up by a phone call. My sister was on the other end; she was crying. I knew immediately. My mama didn't want to tell me, she was afraid for mine and baby girl's safety, but my sister knew I would want to be there. Granny had taken a turn for a worse during the night, and they were saying she probably wouldn't make it through the day. We got up and got ready, went and picked up my brother and sister (my parents didn't want them driving), and went to her house. At that point, I still thought she was going to pull through. She'd beaten every timeline, every time.... but when I saw her, I knew. We got to her house at 1:50 pm, she passed away at 2:00 pm. I know she was waiting on us to get there.
As selfish as it was, all I could think about was how she would never meet my baby girl. When I tearfully admitted this to Ty, he told me that now our sweet girl has a gaurdian angel, and in my heart, I knew it was true. Before they took her away, I got to tell her I loved her one last time, and I asked her to watch over our sweet girl... and I know she will. One day, I will get to tell our girl about her beautiful gaurdian angel... how she never met her, but loved her so much.
11.30.2011
11.16.2011
pumpkin cheesecake (and an apology)
*I apologize for not posting a hair accessory tutorial yesterday... being 35 weeks pregnant got the best of me... but I'm working on one right now that will be posted later today!*
I love pumpkin. anything. No really, anything. If it has pumpkin in it, I'm going to love it, period. I also love a good cheesecake.... so a few years ago I added pumpkin to my cheesecake recipe, and it was delicious. So much so that I make it every year for thanksgiving, and I'm often asked for the recipe. So, this is my gift to you... pumpkin cheesecake. Make it. You'll love it, I promise!
pumpkin cheesecake
Ingredients:1 c. canned pumpkin
3 8oz packages of cream cheese (softened)
2 tsp vanilla
1 1/2 c. finely crushed graham crackers (cinnamon flavored works well)
1/3 c. sugar
3 eggs
1/3 c. melted butter
2/3 c. brown sugar
1/2 tsp. cinnamon
Preheat oven to 325 degrees. Mix graham crackers, sugar, and melted butter in med. bowl. Press into 8-9 in round pan, covering bottom and sides. ( I think you're suppossed to use a springform pan to make cheesecake, but I've always used a regular pan and it turns out fine.) Bake for 7-8 mins.
While crust is baking, beat cream cheese (med- high) in LARGE bowl until smooth. Add pumpkin, brown sugar, vanilla, and cinnamon. Beat (med) until mixed well. In a small bowl, wisk eggs together. Fold into cream cheese mixture, a little at a time.
Pour filling into crust. Place cheesecake pan into a baking pan, and fill baking pan with water until halfway up cheesecake pan. (makes a difference, I promise!) Place in oven and bake abt an hour or until center is slightly jiggly. :)
The water makes the pan really heavy and sloshy (especially after baking) , so be prepared.
Remove from water bath and cool on wire rack at least 1 hour.... I usually do 1 & 1/2 hours. Cover and refrigerate at least 4 hours or until center is firm.
I used to make a pumpkin glaze to drizzle over it, but smuckers sells a pumpkin syrup ice cream topping thing that is frankly just as good when heated, so I usually use that now instead... but cheesecake is totally yummy eaten plain, too.
... now go grab a cup of coffee and enjoy!
11.14.2011
boutique-style hair bows
We had a small baby shower for baby girl on Saturday with my immediate family... and goodness, she already has so much stuff (and we have another baby shower next Sunday)! I was going through it all and trying to get organized, and the one thing I noticed she didn't have enough of was... hair accessories! I know, it seems silly when there are diapers and wipes and bottles to worry about, but every little girl needs cute hair accessories, right?! So... I've decided this week is going to be pretty hair accessories week on the blog! Each day I'll be posting a different hair-inspired tutorial, so make sure you check back daily!
Today's tutorial is....


Today's tutorial is....
boutique-style hair bows

To make one bow, you will need:

- 38 inches of 2 inch wide grosgrain ribbon
- one double prong clip (or other clip variety)
- hot glue gun and hot glue
- needle and embroidery thread
- ruler
- marker
Start by laying out the 2 inch wide ribbon. Measure 4 inches, cut, and set aside. That should leave you with 34 inches of ribbon. Measure 4 inches again and use your marker (you'll want to use a marker so that it bleeds through to the back) to make a dotted line along the width of your ribbon. This will be one of the tails.

Now measure 6 inches from your dotted line. Make another dotted line along the width of your ribbon. Repeat three times for a total of four 6 inch sections. These sections are going to be the loops.

After marking your first 4 inch section and the four 6 inch sections, you should have one more 4 inch section left. This section will be the other tail.

Now, take your needle and embroidery thread (if you don't have embroidery thread, you can use regular thread, but I like how embroidery thread makes the bow a little sturdier) and sew a running stitch along the dotted line at the first 4 inch mark. Make sure you double knot the end of the thread so it doesn't pull through.

Remember when I said you wanted your marks to bleed through to the back? This is where that's going to come in handy. Fold the first 6 inch section so that the back is facing up. You should still be able to see your dotted line. Sew a running stitch along that dotted line.

Now fold the next 6 inch section so that the dotted line is facing right side up. Sew a running stitch. Keep alternating this way until you've sewn a running stitch along all of your dotted lines. You should have something that looks similar to this:

With the needle still attached, pull the thread so that it gathers up the ribbon. Try to keep all right sides facing up as you gather.

After you have pulled the thread tight, wrap it around the center twice and put a stitch right through the middle to secure your bow.

Clip the tails into an angle or a split. I like the split look, but it's up to you. Make sure you fray check or heat seal the clipped ends so they won't ravel. Now, take that 4 inch piece you set aside earlier. Fold it into thirds lengthwise and tie a loose knot. Make sure the knot is facing up on the fold.

Put a dab of hot glue directly onto the back of your knot. Place the knot directly onto the front center of your bow, making sure to cover up the embroidery thread.

Flip your bow over. Now take your clip and line the front with hot glue. Make sure not to over glue... you still want to be able to open the clip! (I used a double prong clip, since my bows will mostly be clipped to headbands and hats for now, but if you are making these for an older girl with more hair to snap into, you may want to use one that snaps.) Place the clip face down over the center of the back of the bow.


Holding the clip open, wrap one of the knot ends around and hot glue it down. Trim off the excess. Repeat with the other knot end.
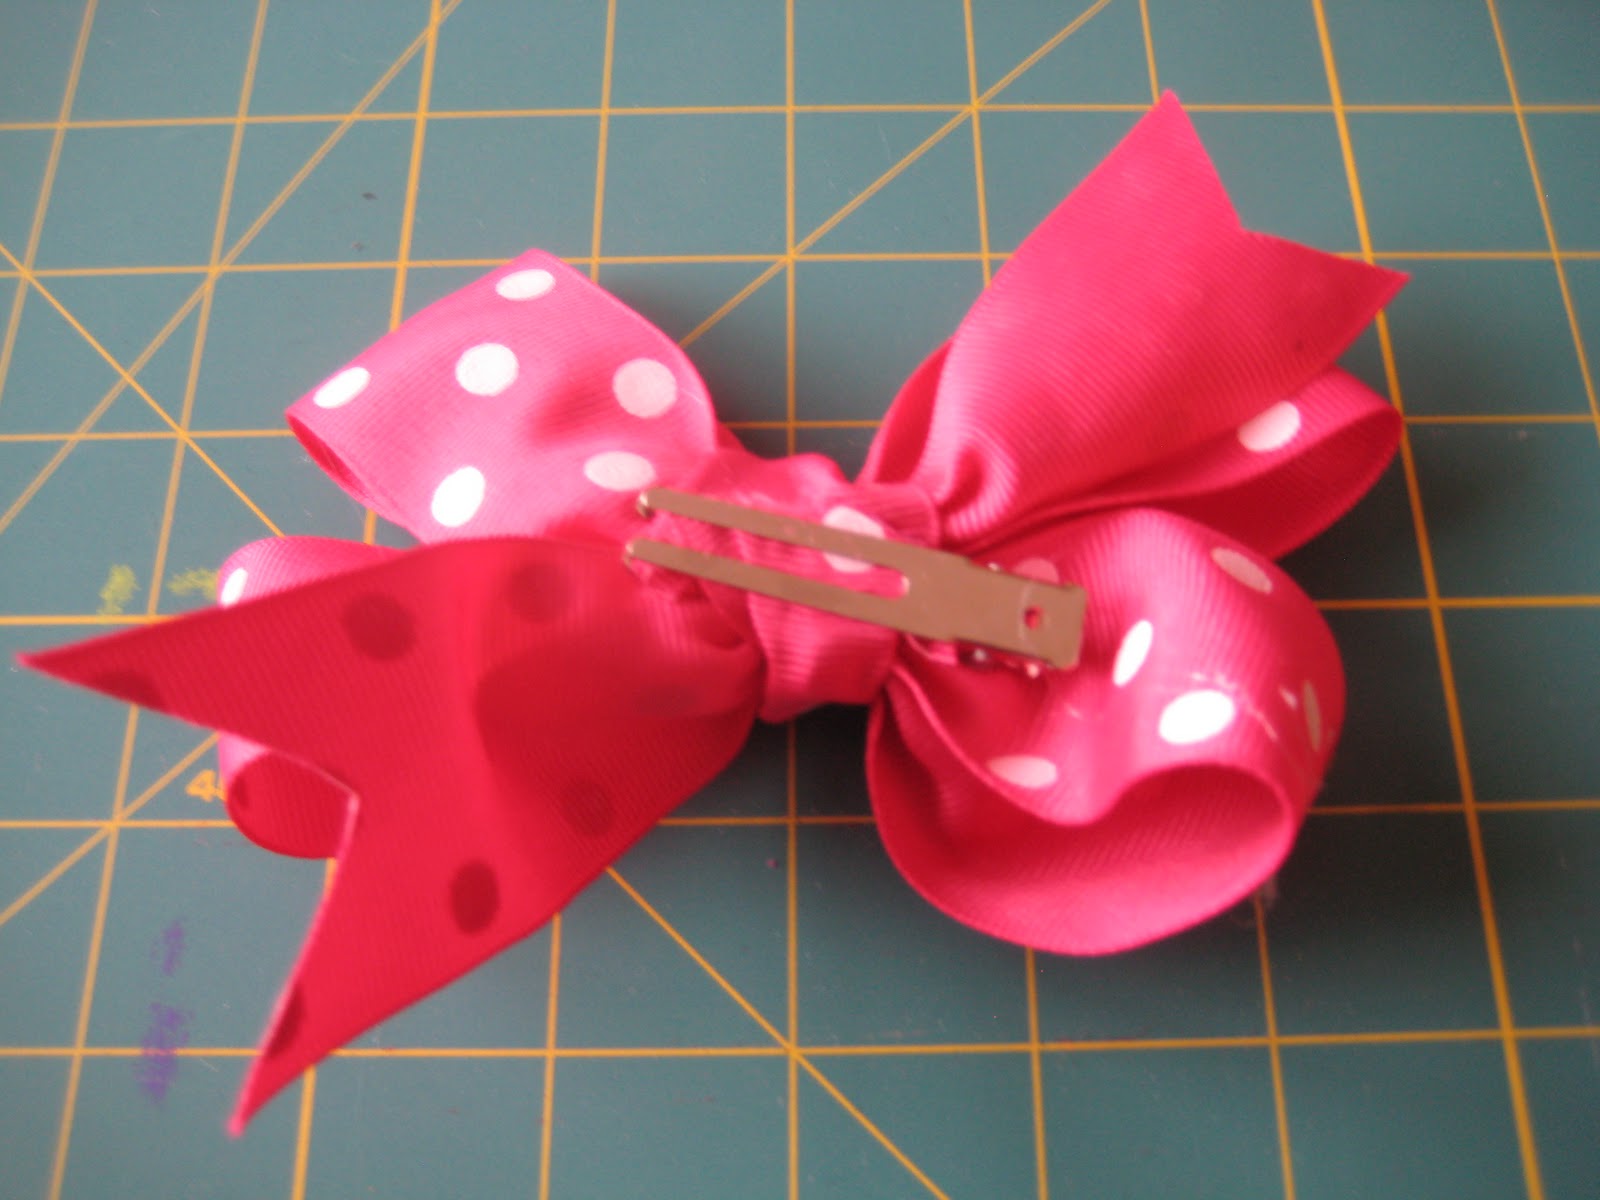
Flip it over and you're finished! You can make a few variations on these by using a coordinating ribbon for the knot instead of a matching ribbon, like on the pink stripe bow below.

Once you get the hang of it, they only take a few minutes a piece to make, and before you know it, you'll have a ton of pretty bows... plus its a really cute, inexpensive way to accessorize a special little lady.
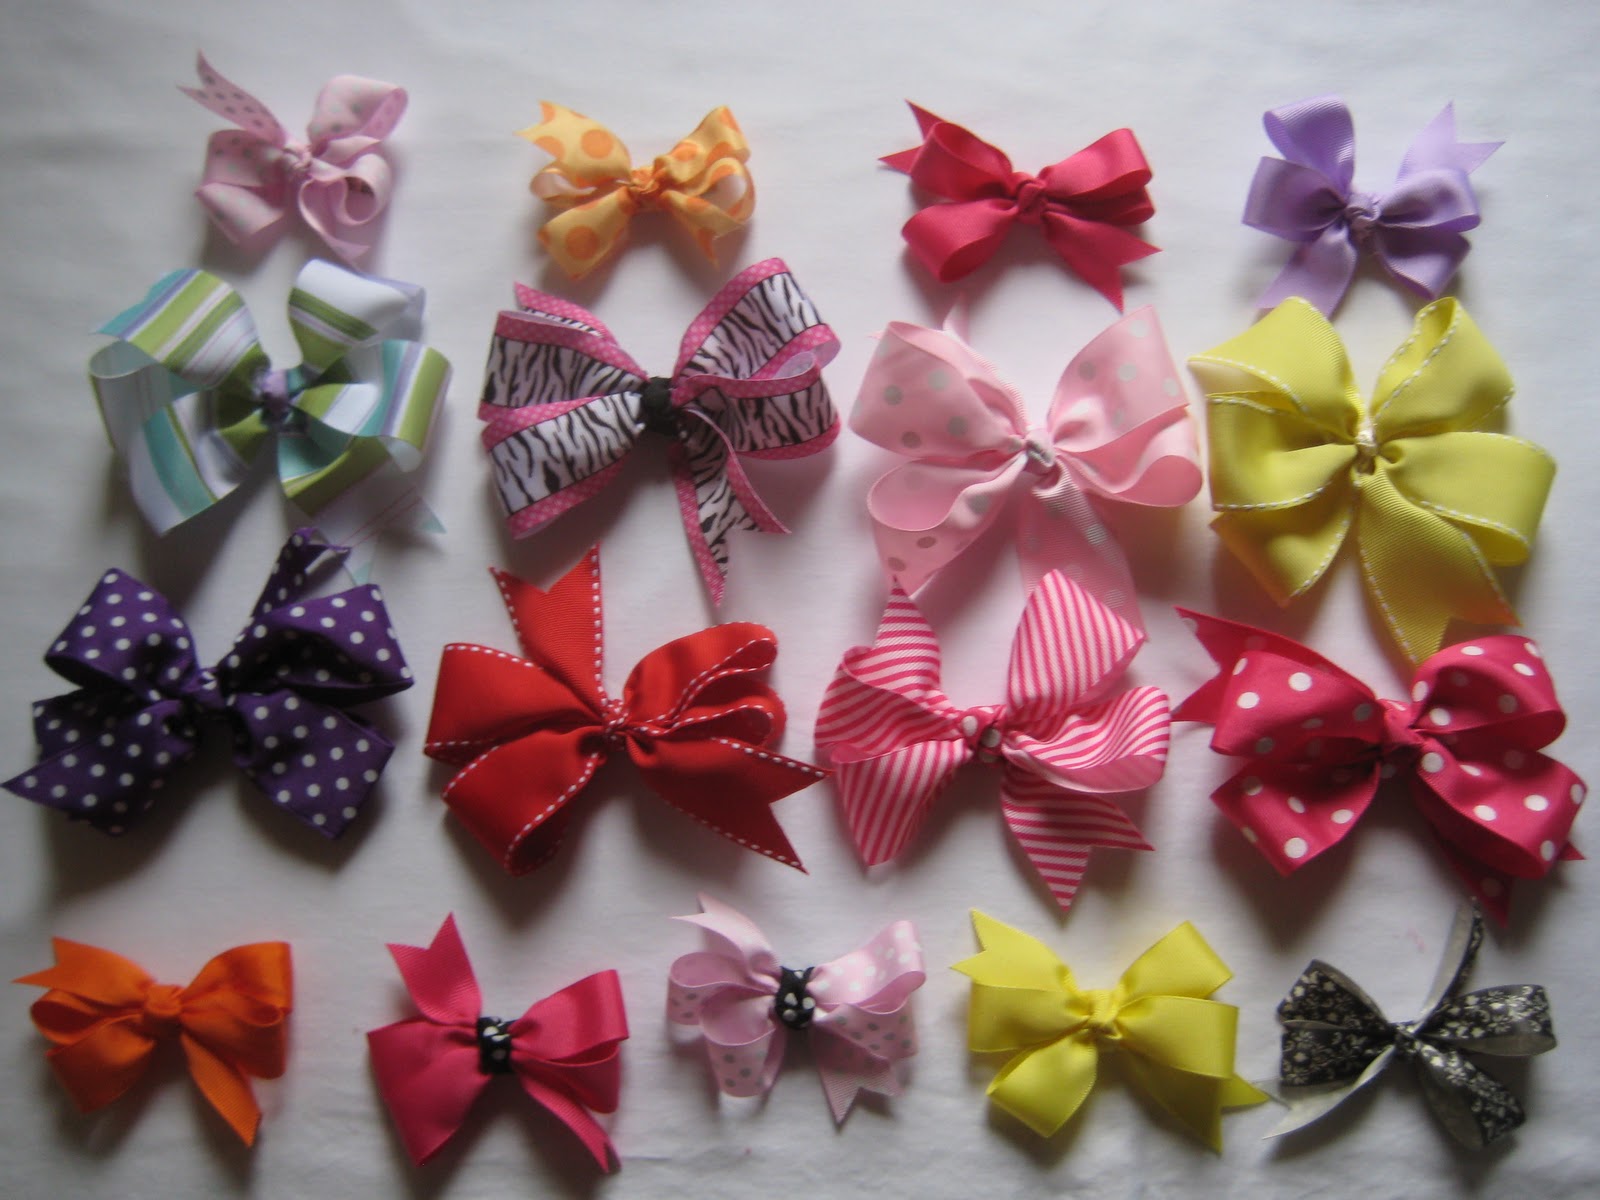
*To make the smaller bows shown above, use a 20 inch long piece of 1 inch wide grosgrain ribbon and follow the directions above, substituting 2 inch sections for tails and 4 inch sections for loops.*
Enjoy your cute new inexpensive boutique-style bows, and make sure to come back tomorrow for the next installment of pretty hair accessories week!
11.13.2011
last day...
... For the grand opening sale in the shop! Use coupon code "GRANDOPENING" to receive 10% off your total purchase! Thanks for checking us out!
11.10.2011
flag bunting pillow
I love flag bunting... it's just so fun and happy. I'm using it on everything these days... decorating, wedding, design, you name it. I recently made this cute little pillow to add to baby girl's nursery.
(Sorry for the wierd shadow... I guess I wasn't paying much attention when I took this picture... we'll blame it on pregnancy brain. ;) )


(Sorry for the wierd shadow... I guess I wasn't paying much attention when I took this picture... we'll blame it on pregnancy brain. ;) )


I embroidered the year on the back using a simple back stitch. It was so easy and I just love how bright and cheery it is. Hopefully baby girl will love it one day too!
11.08.2011
new in the shop
new in the shop....
Collegiate Ruffle Bottom Necklace Onesies... fully customizable for your favorite team!


Collegiate Ruffle Bottom Necklace Onesies... fully customizable for your favorite team!


Don't forget about our discount... 10% off your total purchase now through November 13th with coupon code "GRANDOPENING"!
the right pair of shoes
I'm obsessed with shoes. I always have been. I remember the first time I saw dress-up shoes in the store when I was little (you know, the plastic ones with the low heel?). They didn't make them in my size, but I begged and begged for them, and finally my mama gave in and bought them for me. They were three sizes too big, not even remotely real shoes, but I wore them EVERYWHERE. I felt so glamorous and grown-up! Since I love pretty shoes so much, it's only natural that I would want my baby girl wearing cute shoes, too right?!
So... I made these for her!


So... I made these for her!


I'm still perfecting the pattern for them... just a few more tweaks to make... but when it's perfect, I'll be offering more cute little baby shoes in the shop.
Just remember...
"Give a girl the right pair of shoes, and she can conquer the world." -Marilyn Monroe
Subscribe to:
Posts (Atom)